 by Cowbutt Crunchies Cosplay
Worbla has recently added a new plastic to their lineup, and they were kind enough to send us some to play with! Pearly Art is a smooth, light-colored plastic that claims great smoothness and stretchability. I was really excited to give this a try since it sounded like a smoother version of Black Worbla, but I was surprised to find that the plastic actually handles very differently. Pearly Art is available in Europe and North America at Cosplay Supplies dot com, and will run you $91 for a Jumbo sided sheet.
Heating
Heating Pearly Art was the biggest surprise for me, and the part that it took the longest to get used to. Unlike Black Worbla or Worbla’s finest, Pearly Art does not activate with its telltale “sheen” that indicates that it’s warm enough to mold (or rather, the white color makes this very difficult to see if it does). Pearly Art also activates very quickly and at a lower temperature, which meant that more than once I was sitting there waiting for it to activate, not realizing that this had already long since happened. The other surprising bit is that Pearly Art de-activates and hardens far faster than any other Worbla line except maybe transpArt – within a minute your plastic will be back to its hardened state. If you’re an impatient person like me who likes to heat an entire strip edge or armor piece, then work the entire thing into place over the course of a few minutes, you’re going to need to re-think your plan of attack because this is simply impossible. Instead, Pearly Art forces you to work with a portion at a time – when applying a raised edge to my breastplate, I needed to re-heat it twice before reaching the end.
The method I eventually settled on was to heat the entire piece to start and then begin sandwiching my edges. After making it a little bit around the piece, I’d re-heat just the next spot, sandwich more, and continue until finished. Try not to blast the entire piece with more heat in order to avoid off-gassing from your foam. A lower activation temperature also means that this plastic does not always require heatproof gloves when working with it.
Stickiness and Stretchability
The confusing conundrum of Pearly Art is that it doesn’t “look” sticky because of the lack of shine, but it definitely is! Once heated, I found that sandwiched edges bonded to both itself and to Worbla’s Finest just fine, with about the same amount of stick as Black Art. This plastic does not have the same bananas level of stick as Mesh Art or even highly heated Worbla’s Finest – I was able to separate two pieces of heated Pearly Art without warping. However this trick only works if your pieces have not been pressed into each other; once bonded you will not be able to separate your plastic without ripping. I quite enjoyed how sticky Pearly Art becomes with a much smaller amount of heat when compared to the other Worbla lines. While the stick itself is not anything to call home about, it does not require that the plastic be as hot, which means it’s easier to attach things and to avoid air bubbles from off-gassing foam.
Personally I did not find Pearly Art to be particularly stretchier than Black Art – however take that with a grain of salt as other folks have had great success with the stretchiness. One of the first things I did was rip right through my Pearly Art top layer, while reinforcing my heated sandwich edges with a clay tool – something that has not ever happened to me with Black Worbla. So be mindful when working with this plastic when it’s activated: the tearability and stretchability seems to vary wildly depending on how hot it is, which could explain the mixed results.
Smoothness and Detail Work
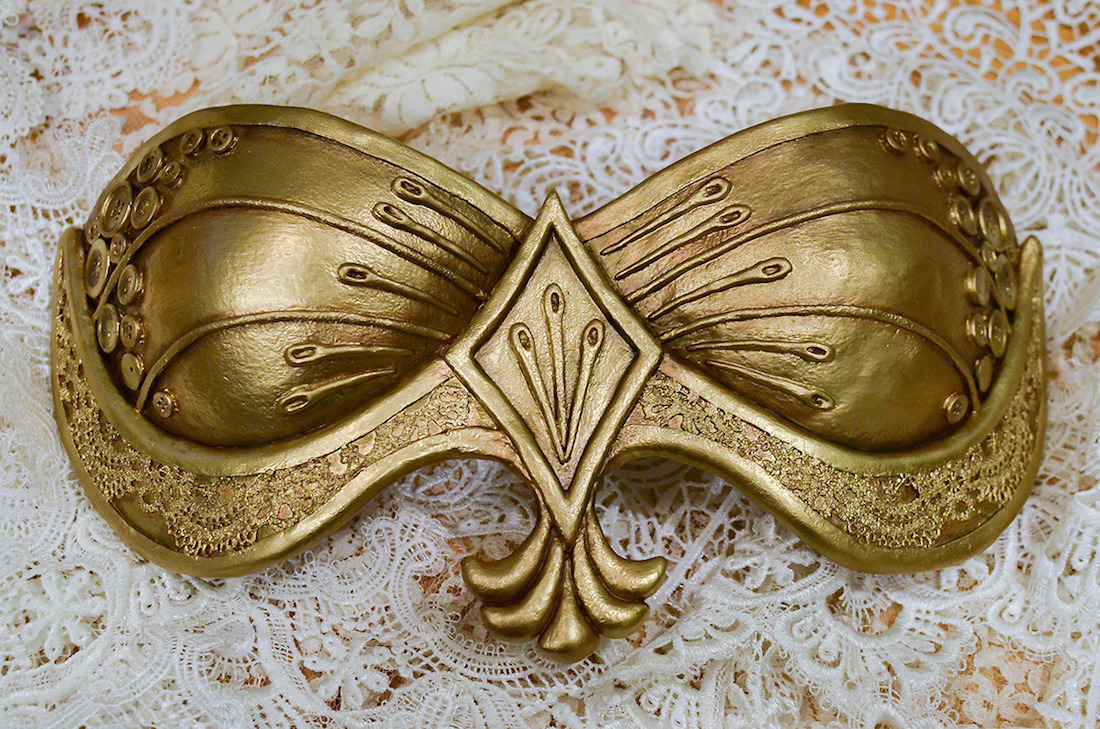
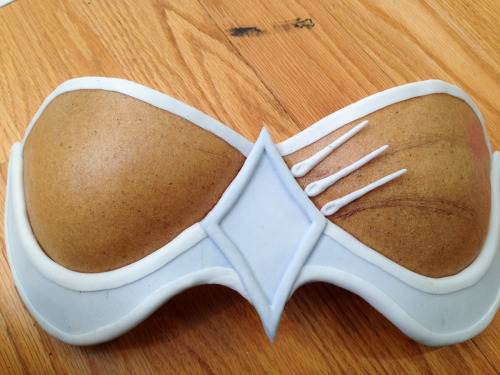
This is where Pearly Art really shines – the final texture is even smoother than Black Art. This means that your pieces will require less priming, especially when little warping or stretching needs to be done. For pieces that are ‘overworked’ by either folding the plastic into itself, stretching, or sculpting to create 3D objects, you will notice that – like Black Worbla – the plastic does tend to texturize and will require more priming than usual. Below are the basic breastplate components I made in the following detailing tutorial, with unprimed Pearly Art and Finest Art pieces: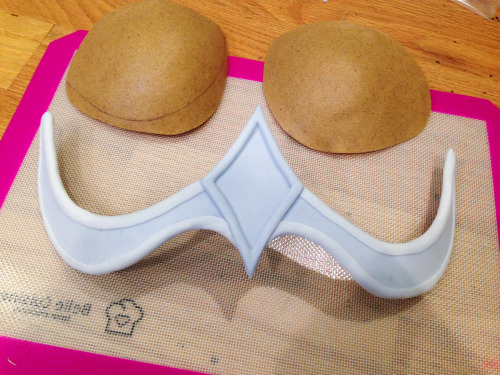
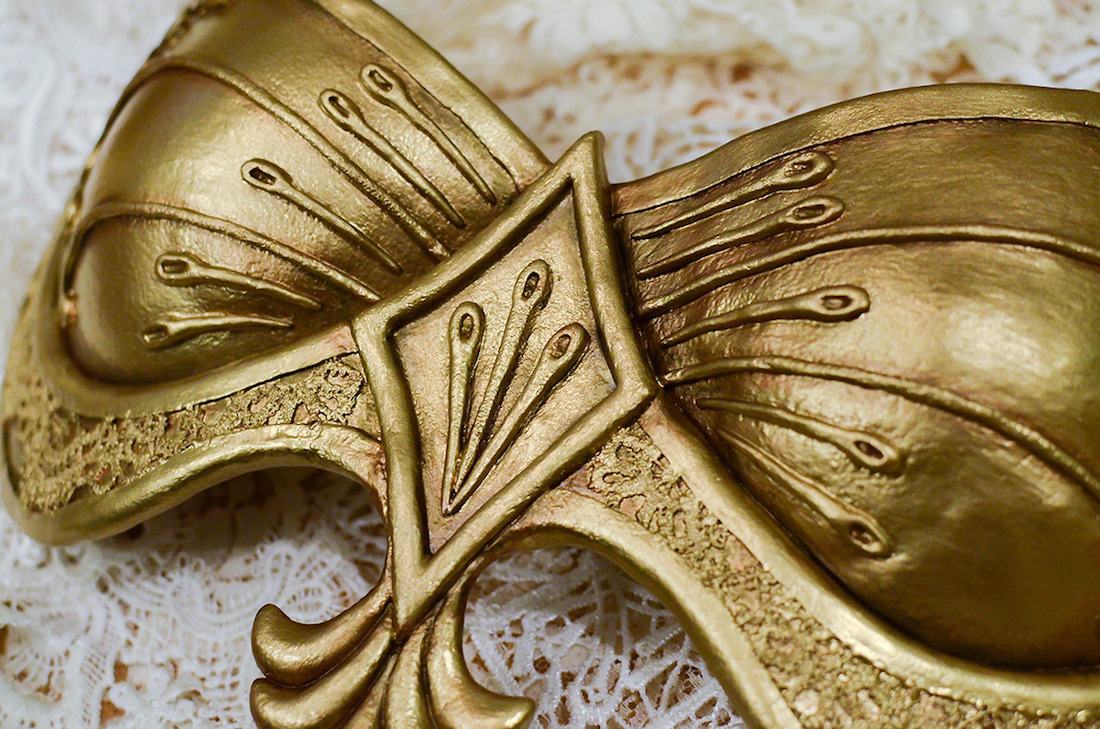
And below is the detailed breastplate after one layer of paint primer. Underneath the paint I used two layers of flexbond over the Pearly Art portions, and three layers of flexbond over the curved Finest Art portions, which still has a rougher texture.

Pearly Art is also excellent for detail work such as 3d sculpting, and noticeably better for this sort of detail than even Black Art. Black Art is great for sculpting as it can be molded but retains a firm hand so your item does not collapse. However, details look better with Pearly Art in part because of the texture, but also because that moldable phase begins at a far lower temperature than it does with Black Worbla. This means that it’s not only easier to heat and mold your pieces, but you can even use your bare hands if you’re so inclined. Pearly Art also does not have the tendency to stick to everything once it’s in this phase, which helps with cutting and small detail movement.

Pearly Art also takes the cake when using a silicone mold to shape your plastic. I’ve tried molding Black Art before and I don’t really like it – like all Worbla it takes on a rough texture once overworked into the clay-like phase, so any details get overshadowed by this rough texture. It’s also not great at picking up detail because of that grain. Pearly Art avoids both of these unless you have severely overworked your plastic. This is great if you need to make many repetitive items like in my walkthrough below, so read on for detailed instructions!
PEARLY ART TUTORIAL: CREATING MOLDED NEEDLES
For a sewing-themed breastplate, I decided to add several identical needles on top of my armor. Rather than mold each of these by hand (time consuming) or use resin (difficult to get the right curve and also time consuming), I tried instead molding my Pearly Art, using a silicone mold of that needle shape. This worked far, far better than my attempts with Black Art, and while it did not capture quite as much smoothness as one would if working with Deco Art, the final needle turned out to be sturdier and could be later touched up and bent into shape, unlike Deco Art which can warp under re-added heat.
Necessary Tools:
• Worbla Pearly Art
• Silicone or metal mold
• Heat Gun
An important component for this is your mold, which can be either something you cast yourself, or a pre-purchased silicone mold that you can find in craft baking stores. In this case we had already made a mold of a needle-shaped button out of Smooth-On’s Moldstar silicone. When choosing your mold, be sure that this is composed of silicone or metal, NOT plastic. While Pearly Art does not have the wildly sticky properties of Mesh Worbla, you still run the risk of accidentally bonding your Pearly Art to the mold’s plastic if you press too hard or heat it too much.
1) Begin by heating up a piece of Pearly Art or plastic scraps until you can mush them together into a plastic ball. Remember that Pearly Art reaches that floppy, moldable stage very quickly and will not gain a glossy seen. Try not to over-heat the plastic in order to keep the texture minimal.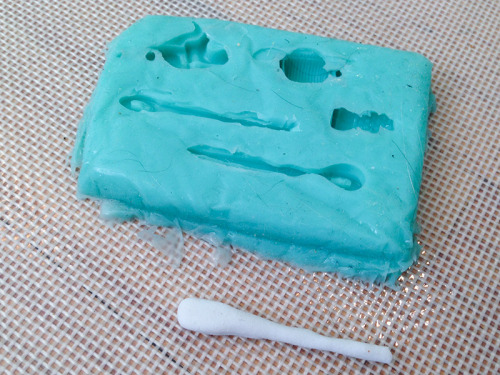
2) Stretch the plastic into the approximate shape of your mold – Pearly Art loses heat amazingly quickly and so you really only have a max of maybe 20 seconds to sculpt.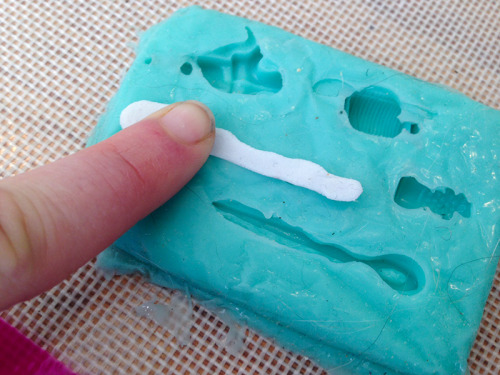
3) Squish the Pearly Art down into the mold, pressing pretty firmly until everything’s flat on top. Allow to cool for a few seconds, then pull it out.
4) It’d be pretty difficult to pull a perfect mold since you’re basically shoving the plastic in with your thumb – even with resin you’re often left with a little bit of excess from where the material overflowed from the mold itself. If you have a lot of this overflow, you can trim it off with scissors. Properly estimating how much plastic you need in your mold helps a lot, as does trimming off large amounts of excess with scissors. However for a small amount of spillover, re-heat the needle with just a small amount of heat from your heatgun until it is soft enough to press but not so floppy that it completely loses its shape. Using your finger, pat down any excess down until the edges are smooth.
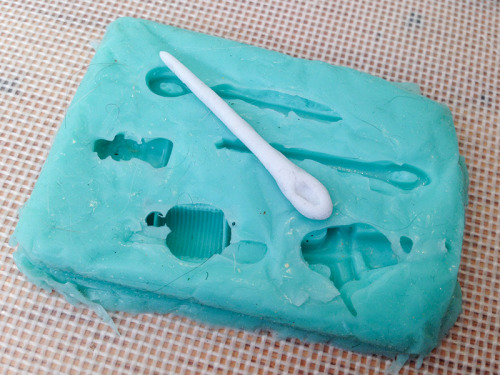
5) Set aside and allow to fully harden.
If you don’t like how your cast turned out, just re-heat your plastic and mold it again! Pearly Art is completely recyclable and may be re-heated over and over again.
6) Heat the underside of your finished needles slightly, and heat the area of your armor. Remember, only a small amount of heat is required! Position your needle and press down firmly to bond.
Prime your armor and paint as desired!
For the original post and lots more great tutorials go to cowbuttcrunchies.tumblr.com, their costume tumblr for process pics, tutorials, and completed photosets. Hhhhammy specializes in props and pattern drafting, while Gothichamlet prefers design and wigmaking. They also sew a lot and spend a generously ridiculous amount of time doing dumb things.