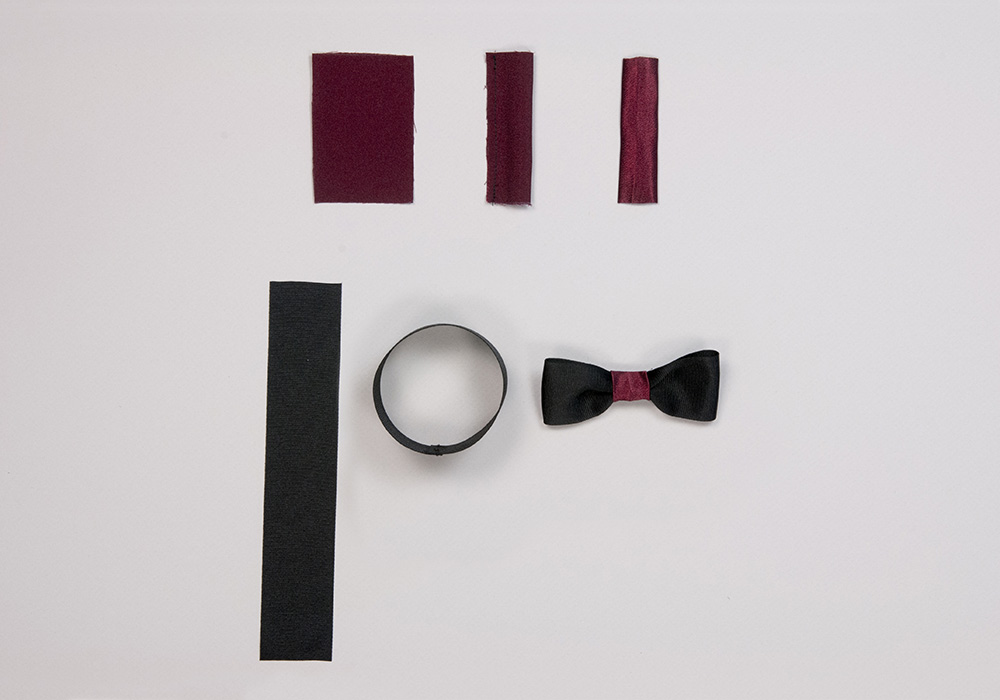
MATERIALS
3/8 yd. light or medium-weight woven fabric (Main Bonnet)
1/4 yd. medium-weight woven fabric (Bonnet Band)
3/8 yd. medium-weight fusible stabilizer
1 yd. Simplicity pre-gathered 2” wide lace trim
1 yd. Simplicity ½” wide decorative trim
1-1/2 yd. 3/8 in. grosgrain ribbon
1/2 yd. 2” grosgrain ribbon
Thread
Fabric Glue
Sewing machine
Pattern Pieces (follow measurements to resize to scale onto 8.5″ x 11″ paper)
 Step 1
Cut two bonnet pieces from the main fabric and two additional pieces from the fusible stabilizer. Align bonnet stabilizer pieces with adhesive sides together. Press, following manufacturers instructions, to create a bonnet insert. With right sides together, pin the two main bonnet pieces together, sandwiching the insert between them, and leaving the bottom edge open. Sew using a ¼“ seam allowance. Clip curves and trim seams. Turn right side out through bottom opening and press. Topstitch with matching thread close to outer edges. Step 2
Cut a 36” x 2” strip of the main fabric and fold in half lengthwise. Position the overlay template on the short edge of the fabric strip with the long edge of the template matching the raw edges opposite the fold. Mark a cutting line along the curved edge of the template and cut. Repeat for other end. Attach the lace trim to the folded edge of the fabric strip, turning under the raw edges of the trim. Working from the center and making small, evenly spaced pleats, the raw edges of the strip to the lower edge of the main bonnet and baste.
 Step 3
Using a long running stitch, gather the upper edge of your fabric strip where it’s attached to the lace, pulling up the gathers so the strip lies flat against the main bonnet. Secure to the main bonnet using fabric glue. Glue the decorative trim over your stitches, covering the header of the lace as shown.
Step 4
With right sides together, pin the curved edge of one bonnet band to the back of the main bonnet, easing stitch to fit. Stitch, using a ½” seam allowance. You should have ½” overhang on either end for tie placement.
 Step 5
With right sides together, pin the curved edge of the second bonnet band to the front of the main bonnet, easing to fit. Stitch, using a ½” seam allowance. Clip curves and press away from main bonnet.
 Step 6
Turn back the open short edges of the band. Insert an 18″ length of 3/8″ wide ribbon on each short edge, centering and matching raw edges. Stitch using a ½” seam allowance, being careful not to catch in your main bonnet. Clip corners and trim seams. Turn right side out and press to expose ties. Step 7
Fold under ½” on open edge of bonnet band, making sure raw edges are hidden inside. Topstitch along outer edges of band.
 Step 8
Cut two 8” lengths of 2” ribbon. Sew short ends of one strip together to form a loop. Cut two 2″ x 3″ pieces of main fabric. Fold right sides together lengthwise and sew, using a ¼” seam allowance. Turn right side out and press. Sew open ends together using a ½” seam allowance to create a loop. Trim seam. Insert ribbon loop through fabric loop to form bow. Sew or glue to bonnet sides as shown.
Complete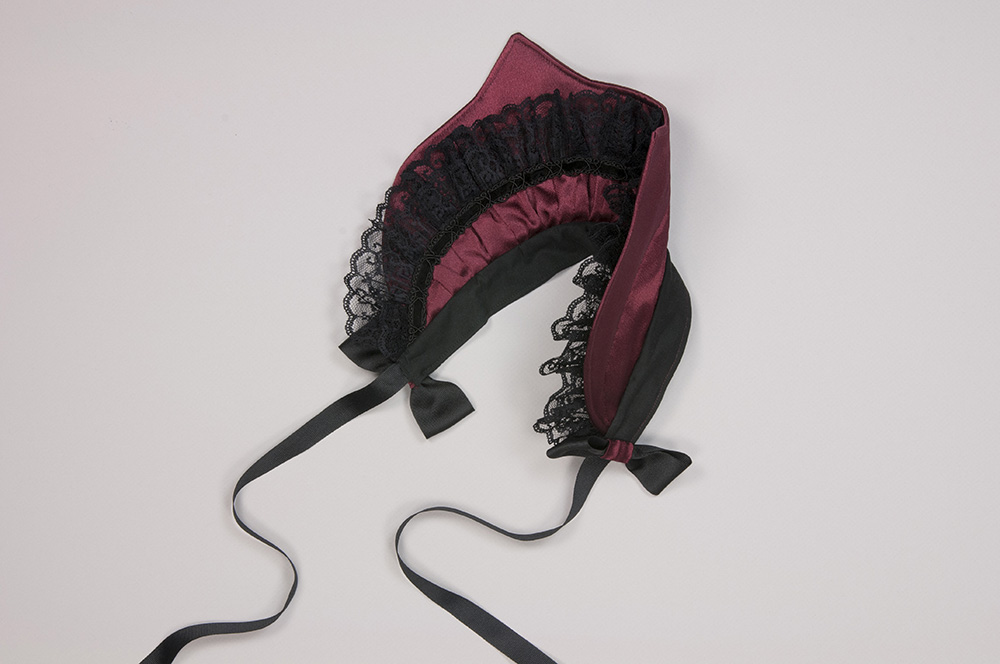
FELINE LOLITA: Cat Bonnet Tutorial
12
I like it
1
I don't like it